
You can setup the PowerShell profile as follow.
1. Open the PowerShell.
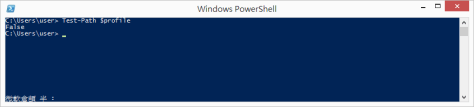
2. Check if the profile file exists. Please note that the letter-case doesn’t matter.
- test-path $profile
3. Create the profile file if the above it does not exist.
- new-item -path $profile -type file -force
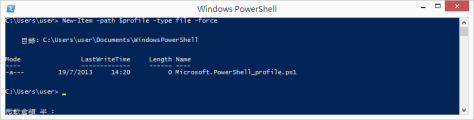
4. An empty profile file is created.

5. Here is example config for the profile.
# Set the default path
set-location c:\

# Get the shell window
$shell = $Host.UI.RawUI

# Set the shell title
$shell.WindowTitle="Eureka!"

# Set color theme
$shell.BackgroundColor = "Black"
$shell.ForegroundColor = "White"

# Set the shell window size
$size = $shell.WindowSize
$size.width=120
$size.height=40
$shell.WindowSize = $size

# Set the shell buffer size
$size = $shell.BufferSize
$size.width=120
$size.height=400
$shell.BufferSize = $size

# Setup alias to start the text editors by commands
new-item alias:np -value "C:\Windows\System32\notepad.exe"
new-item alias:sublime -value "C:\Program Files\Sublime Text 2\sublime_text.exe"

# Clear the shell
Clear-Host
6. Restart the PowerShell.

Done =)
Reference: How-To Geek – Customizing your PowerShell Profile


One thought on “Windows PowerShell – Setup user account profile”